So- Sourdough!

So apparently, sourdough is trending since so many are in quarantine.  (Quarantine kitchen- seriously, go check out @ManitowocMinute.)  I hope everyone stays healthy!  It makes sense- homemade bread is so delicious, and it’s not too difficult to make.

Around the time this first started, I thought I’d give making a sourdough starter a try.  Last fall, we were able to travel to San Francisco with friends and, as part of our trip, have some sourdough at the renowned Boudin Bakery.  Pure excellence.  We were able to see their museum/restaurant and hear the story about how their starter was saved from disaster- but that’s another post.  That’s also where we had the idea to try their chocolate sourdough.

boudin

I’m certain I was not able to recreate quite the same as Boudin’s storied and specialized San Francisco sourdough, but we did get our own starter going, and were able to make some different recipes with it here in Wisconsin.

Apparently, it is a trend to name sourdough.  I asked our son what we should name it, and I had thought he had said “I don’t know.”  Actually, he meant and clarified “Doughn’t know”- I thought that was pretty witty and astute for a little kid.  He loves to cook and help me make bread, so he’s been involved in all of the steps in all we’ve tried.

First, we needed a recipe for starter, and thought we’d give this one from Taste of Home a try.  It worked out well.  We were able to get a starter going quickly, and only tossed the first portion we removed in the first week since I had read that it likely was not strong enough to raise the dough.  We have been baking successfully ever since.  I’m not someone who is going to bake something every day or want to babysit a starter, so the recipe has worked well to store in the the refrigerator when not in use.  We still followed the directions to feed it once a week.  I won’t re-hash all the recipe specifics, or this will get to be a REALLY long post (please review the links!)

Here is the mixed starter:

starter mixed


Starter direct from the fridge, prior to feeding/mixing (notice the liquid on top):

starter fridge

We found several good recommendations for making sourdough bread from this very helpful website- The Clever Carrot:

Always smell the sourdough starter- just to make sure it still smells yeast-y and bread-like.  When baking, I would have just put the dough on our pizza stone, but the Dutch oven works fantastically well.  It helped to ‘work in reverse’ for timing- plan out the amount of time needed to warm/feed the starter, let the bread dough rise, and then rise again before baking it.

We tried the bread recipe from Tasty.

We did use cornmeal on the bottom of the pan, which helped give the bread crust a nice crunch.  It worked better (easier to clean) by using parchment paper in the Dutch oven and put the cornmeal/dough on that.  Definitely score the bread on top so the steam can escape in a specific spot.

bread in Dutch oven


The fresh bread smells so good, but it is important to let it cool and wait about an hour.

One week later…starter in the fridge, and then re-fed.

After we tried regular sourdough, we tried making pretzels:

We did not prepare the egg wash, but they were still fantastic!

pretzel mix

pretzel dough

pretzel dough shaped


(Please forgive our non-standard pretzel shapes- still delicious when cooked!)  They were best as pretzels fresh, but great as burger buns the next day!

pretzels


Another week later, we tried chocolate sourdough!


chocolate mix

chocolate dough

chocolate dough rise

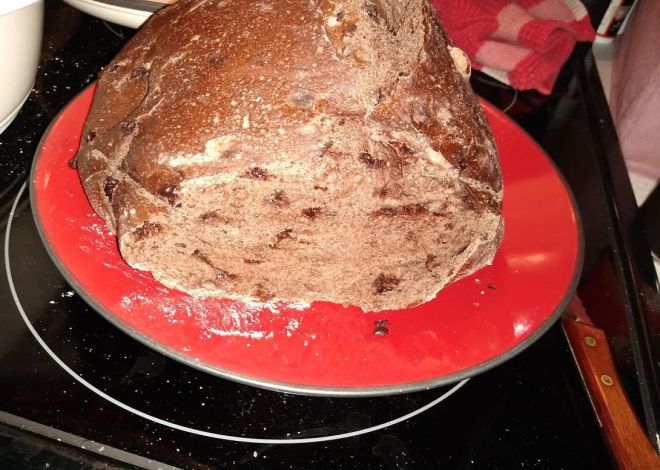
chocolate sourdough

chocolate bread cut


There was no separate recipe, just my estimate/guess-timates.  I used the Tasty recipe from above (and let the dough rise twice), and added 2 tablespoons of regular cocoa powder and 2 tablespoons of dark cocoa powder to the mix before adding the sourdough starter.  I also added half a cup of mini semi-sweet chocolate chips.  We didn’t add sugar to the recipe- there’s no sugar in the recipe, so next time, we might try adding more cocoa powder (maybe another tablespoon each and/or another half cup of chocolate chips).  This would make it 3 tablespoons of each cocoa powder and 1 cup of mini semi-sweet chips.  Regular size chocolate chips may work as well, but we have not tried it.

Next on the list may be sourdough pizza crust… The tour of deliciousness continues…

If you’ve made a starter, what have you made?

‘Super Bowl’ Spaghetti Squash – Fritters

It may not be typical Super Bowl fare, but it’s still Super delicious!

Are you tired of plain, regular baked spaghetti squash with pasta sauce?

Do you want to try something as good or better for your garden-grown or supermarket-selected spaghetti squash?

We made these Italian-Style Spaghetti Squash Fritters- recipe.  (Recipe via Oh My Veggies)

We made four batches of this recipe from one spaghetti squash, but that, of course, would vary by the size of the spaghetti squash.  (And you can also roast the seeds separately in the oven for a snack too!

It was very easy to mix up, and they were easy to fry, though it took a little to have them done on both sides.  It helped to flatten them a bit with a fork when placing them in the pan.  We ran out of ricotta on the last batch, so we swapped in some cottage cheese, which worked well.  They turned out nicely crunchy and were flavorful- the garlic, cheese, and herbs were noticeable just by themselves.  They’d make an excellent substitute/side in place of potato pancakes.

We thought they’d also be perfect with some cumin and cilantro in place of the Italian herbs/seasoning, and then they could be topped with salsa instead.  They could also be good with curry powder in place of the Italian herbs/seasoning.

Enjoy (for the Big Game, or anytime)!


Eat well, my friends!

Well, it’s the Super Bowl again, and while my team is not playing, and we’re not having a party, it’s not a bad day to plan a quality meal.  We had some beef tenderloin in the deep freezer, some Jones Farm bacon and thought a crock pot meal might be the way to go as an alternate to grilling in the cold and snow.  (Thankfully, it’s stopped snowing.)  I came across a recipe for a crock pot beef tenderloin via A Spicy Perspective:

(Check out the recipe card for the directions and ingredients.)

Recipe card: https://www.aspicyperspective.com/beef-tenderloin-recipe-balsamic-glaze/2/ 

Process: https://www.aspicyperspective.com/beef-tenderloin-recipe-balsamic-glaze/

While mine didn’t end up looking the same, it still smells heavenly!  (Final pictures to follow once it’s done!)

I seared mine in a cast iron pan- cast iron is starting to grow on me, and it’s not hard to clean.

beef tenderloin w bacon in a cast iron skillet

A pile of onions and garlic ready to go in after the crock-potting of the tenderloin:

onions and garlic next to a crock pot

The tenderloin getting ready to begin its slow cooking- with the bacon juices marinating from the top!

We have a rosemary plant indoors that’s liking the window well enough, so thankfully, we had fresh rosemary.

roast with onions, garlic, bacon, and rosemary

After cooking a while, I added the remaining ingredients, but realized I was almost out of balsamic vinegar… But, no worries- you can make a substitute with red wine vinegar (which, thankfully, we have- no emergency trip to the store this time!)  I used the last of the balsamic I had and filled in the rest with my substitute.  It smells great so far- we should be eating during the game.  (Finished product photo to follow!)  Eat well, my friends!  (Verdict: delicious!)

Super Bowl of Snacks

US map with Google searches per state

 
Or plate of snacks… or tray of snacks….

There’s still time to make some deliciousness for the ever-popular Super Bowl party…

Find out what the most popular Super Bowl Sunday snack Google searches are for each of the 50 states.  (The map above is from the article.)

In Wisconsin, it appears that Buffalo Chicken Dip is the snack recipe to find!  Little did I know that when I posted a recipe here previously for Buffalo Chicken Dip.  It is also the snack searched for by Patriots fans in their home state.

Falcons fans in Georgia are looking for Pico de Gallo – also good!  No matter which team you are cheering for, there’s always a good reason to snack deliciously with something homemade.  What are your go-to/favorite Super Bowl Sunday snacks?

Grilling…

grill with fire

Lit grill (from Wikipedia commons)

There’s nothing quite like grilling out, and one recipe that has turned asparagus-haters into asparagus-lovers in my family is grilled balsamic asparagus.  There are quite a few tasty yet simple variations available online.  Mine is as follows; amounts are determined by the amount of the veggie you are making.  The coriander provides a citrus-y zing that goes well with the balsamic.

This recipe is easy to make in a skillet/wok, though flame grilling provides a better flavor, IMHO.

To prepare the spears, it’s not required to trim them with a knife or peel them.  You can snap the spear in two towards the bottom (the more fibrous part will separate from the more tender part naturally).


Grilled Balsamic Asparagus

Bunch(es) of fresh asparagus spears

Olive or vegetable oil

Balsamic vinegar

Salt

Pepper

Coriander (crush the seeds with a mortar and pestle or use powdered coriander)


Rinse and prepare asparagus (as noted above).  Put all ingredients into a sealable plastic bag and set in a baking pan (in case the bag leaks).  Refrigerate and marinate for at least 1 hour, mixing at least once or twice, so all spears sit in the mixture/are coated well.  Grill until the spears are cooked to desired doneness, rotating as needed.  (I prefer to cook them until darker green, but not so much that they are mushy.)  Serve hot.

Enjoy!

(And watch for grill flare-ups due to the oil; make sure to grill safe!)


Vegan/Vegetarian Pulled ‘Pork’ (Spaghetti Squash)

We had some remaining spaghetti squash from this year’s growing season, (it’s December, and they keep really well!) and had just had the classic spaghetti-squash-with-spaghetti-sauce iteration recently, so we wanted something different (and simple!)

I stumbled across the original recipe idea: http://greatist.com/eat/recipes/barbecue-spaghetti-squash-pulled-pork-tacos, but wanted something even simpler than that.  A crock pot beckoned.


Ingredients:

1 or 2 spaghetti squash (depending on size, may need more if smaller squash)

Coconut Oil

Cumin


BBQ Sauce (I used a bottle of Sweet Baby Ray’s: http://www.sweetbabyrays.com/ but use whichever you like, or make your own)

1 large onion

2 cloves garlic

Salt and pepper to taste


Cut squash length-wise and remove seeds. Remove the stem end. (You can make and snack on roasted squash* seeds** while you are waiting for this to cook!)   Put aluminum foil in a baking pan large enough for squash (use a pan with sides). Rub coconut oil on cut sides and in center of squash halves.   Sprinkle cumin over all and put cut side facing down, onto aluminum foil. Bake halves at 350 for at least 45 minutes, until squash is tender- check with a fork. (It should string out like spaghetti from shell.) More baking time may be needed; it will depend on the size of the squash.


Put 2 cups of water in crock pot. Mince onions and garlic and add to crock pot. Add half of squash to crock pot and top with BBQ sauce. Add remaining squash and top with more BBQ sauce. Follow crock pot directions (can be on low or high setting).   Stir halfway through cooking time.   Add more BBQ sauce to taste. Let cook with crock pot cover off for a little if mixture is too watery. Serve on rolls/buns.

recipe in crock pot


Crock-potting it up!


recipe plated with rolls


Post-crock.


Feedback:  The cumin gave the squash a nice deep flavor, and the BBQ simmered down to be very rich and robust. We would definitely make this again.  We froze some for later use.

Some family members said they liked this better than actual pulled pork because it was not fatty.

The squash (not altogether unexpected) was maybe lighter than my hardwired-for-pulled-pork brain was expecting.  Next time, I may add a few lentils to cook in the crock pot with the mix to add a little more heartiness to the dish/make it more toothsome.  I’d have to watch the liquid levels, though, just so nothing dries out.

*                                                                   *                                                            *


*Yes, these squash seeds will work too- move over, pumpkin!

**Additional recipe for roasted squash seeds: Check out the link, or use my way- cover a pan with parchment paper- no butter/oil needed.  Add squash seeds (no need to rinse, though you may want to pick out any random squash strands).  Shake your favorite seasoning over seeds.  Salt, if desired, or a no-salt seasoning works just fine too.  Stir and season again.  Bake at 350 for 10 minutes.  Remove from oven and stir.  Add more seasoning if desired.  Bake another 10 minutes or until seeds have completely dried (the seasoning will dry/adhere to the seeds).  Enjoy!

Recipe: Chettinad Tomato Lentils

I have to recommend the recipes in The Curry Bible by Jacki Passmore; we’ve tried a few so far and they’ve been excellent quality and variety-wise.  The base spice mix for this curry (from pg. 90) is my favorite so far.  There are so many curries, and they go beyond the pre-bottled store curries for sure.  We have made this recipe several times, and it is a pleasant mix of hot and spice.  It could very easily be made hotter with more/other peppers.  We’ve modified the original to be less hot to work for both of our palates.  (I’m more of a heat fan.)   The original calls for chicken as the main ingredient, but I wanted to give lentils a try as an alternate option; it’s also a little more affordable.  The lentils also hold up well in the curry, even as they are already cooked. (I was a little nervous it would be mush.)

1 lb lentils, made according to package directions

3 dried red chilies, seeds removed (I used 1 each of guajillo, ancho, and mulato chiles)

1 1/2 teaspoon coriander seeds

1/2 teaspoon black peppercorns

4 teaspoons cardamom

3/4 teaspoon cloves

1 teaspoon cinnamon

1/2 teaspoon fennel seeds

1 tablespoon salt

7oz dried coconut (unsweetened)

Oil (I used olive)

1 large onion

4 cloves garlic

1/4 teaspoon ginger

1 1/2 teaspoon star anise

6 oz tomato paste (I used the whole 12 oz can to use it up.)

2-3 cups water

2 tomatoes

1 fresh chili pepper (I used Poblano)

Additional salt to taste

Lemon juice

Make the lentils in a pot according to package directions.  (Ours were at medium heat – simmer/boil for about 20 minutes, and they were tender.)  While lentils are cooking, prepare the curry. (When the lentils are done, remove from heat and drain.)  Roast the coriander seeds in a pan on medium-low heat for a minute or two and remove from heat.  Put the deseeded peppers, roasted coriander, peppercorns, cardamom, cloves, cinnamon, fennel seeds, and salt in a blender and blend to a powder.  Add coconut and blend until fine.

Curry powder mix

Curry powder mix


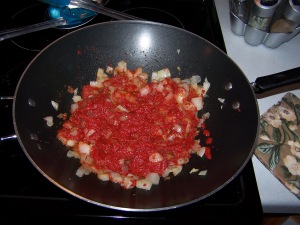
Heat the oil in a pan.  Chop the onion and add to the pan.  Let cook for a few minutes, stirring as needed.  (The onions don’t need to be completely soft.)

Onions in the pan


Crush the garlic- (a garlic press works well) and add to pan with the onion.  Add the ginger.  Don’t let the garlic cook too long- you don’t want it to burn.  Add the star anise and tomato paste.

Tomato paste added


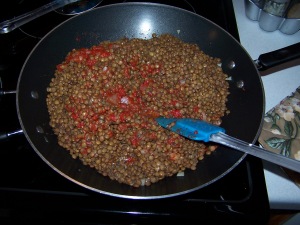
Stir in the cooked lentils slowly.  Add the water- you don’t want soup, but you don’t want it to burn.  Keep stirring frequently to prevent sticking.

Lentils added


I chopped and added the tomatoes and chili pepper at this point (you may want to wear gloves with the pepper), but depending on how cooked you would like them, you could add them earlier.

Tomatoes and pepper added


Almost done!  I cooked the mixture with the added vegetables for about 5 minutes more, so they were not cooked completely through.  Keep stirring as needed, and add more water if needed so that the lentils do not stick to the pan.  Season with additional salt to taste, and top with a splash of  lemon juice.

Finished dinner!


Enjoy!!! Remember to have fun and experiment with curry!


Also, here are some quick general spice equivalents, if you have whole spices:

1 stick cinnamon= 1 teaspoon

1 pod cardamom= 1 teaspoon

1/4″ piece ginger= 1/4 teaspoon

1 star anise pod= 1/2 teaspoon

1 whole clove= 1/4 teaspoon

Steep It!

Lately, I’ve been coming across recipes that call for steeping items over a period of time, so savor the spirit of slow with me!  I started homebrewing recently, and while I don’t know that I’d describe the brewing process with “steeping” at any point, essentially that’s what I did with the last batch to infuse some cherry flavor during the fermentation process.  As long as we’re on the subject of alcohol, let’s start with a primer on extracts.  Those tiny bottles in the stores aren’t the cheapest item on the shelves, so let’s see how to make our own vanilla extract:

I’ve got a batch processing in a small canning jar, and it has gone along nicely.  It is handy to know that it is essentially an endless/bottomless recipe, too!  I was also referred to a similar recipe by a friend and found it again in a vanilla cookbook at a resale store (it also mentioned vanilla sugar!)

For more adult beverages, we can make coffee liqueur or orangecello.

Another intriguing idea was to infuse honey using lemon verbena leaves to impart the lemon flavor (pouring the honey over the leaves in a small canning jar).

Steep it good!

Recipe Rehab

We might have lost some Saturday morning cartoons, but one show not to miss on Saturday mornings is Recipe Rehab on CBS.  Above is the promotional clip from today’s Chicken Pot Pie episode.  The basic synopsis revolves around transforming an enjoyed but unhealthy family recipe (high amounts of fat, salt, using prepackaged goods, preservatives, and/or lack of fresh vegetables, etc.)  The half hour show pits two chefs against each other in a friendly, yet competitive game to create an improved version of the dish utilizing the essence of the original.  The new meals are prepared by the family, and rated in several categories like ease of preparation and taste.  A nutritionist also provides one of the scores.  Often, the chefs will re-imagine the presentation of the dish along with finding ways to impart flavor through additional ingredients, spices, and fresh vegetables.  If the show is not on your station, or you can’t otherwise watch, episodes and recipes are available online.  It’s difficult to not get hungry much too early in the morning, even after breakfast!  I’d highly recommend checking it out as a way to think about eating healthy.  Whether you are cooking for yourself or for your family, it exhibits some excellent ideas about swapping ingredients for the better and encouraging all members of the family to participate in meal making and cooking.

DIY Laundry Soap

Here is a Homemade Laundry Soap recipe, courtesy of Ace Hardware:

laundry soap recipe


1 box of super washing soda 3lb 7oz
1 box of Borax 4 lb 12oz
1 box of pure baking soda 4lb
3 bars of Fels-Naptha soap 5.5oz
(optional) 1 container of Oxy-Clean 1.3lb

Grate the Fels-Naptha bars using a cheese grater or food processor into a fine consistency. Pour each of the ingredients into a large container and mix well. (Use 1-2 tablespoons per load. It can be used in high-efficiency washing machines.)